[Azure] CLI 명령어를 통한 Blob Storage 생성 및 사용
Azure Blob Storage는 대규모 비정형 데이터를 저장하고 관리하는 확장 가능하고 고가용성의 객체 스토리지 서비스입니다.
Azure CLI 명령어로 스토리지 계정에 컨테이너를 생성 후 파일을 업로드 및 다운로드를 해보도록 하겠습니다.
스토리지 접근 방법
Azure CLI를 통해 스토리지를 접근 시 Auze login을 통한 권한이 있는 계정에 접근하거나, 스토리지 계정에 있는 액세스 키를 사용하여 스토리지를 사용할 수 있습니다.
Azure CLI 설치 및 login 방법은 아래 링크를 통해 확인해보시길 바랍니다.
https://every-up.tistory.com/77
스토리지 액세스 키는 스토리지 계정의 액세스 키 메뉴에서 확인하실 수 있습니다.
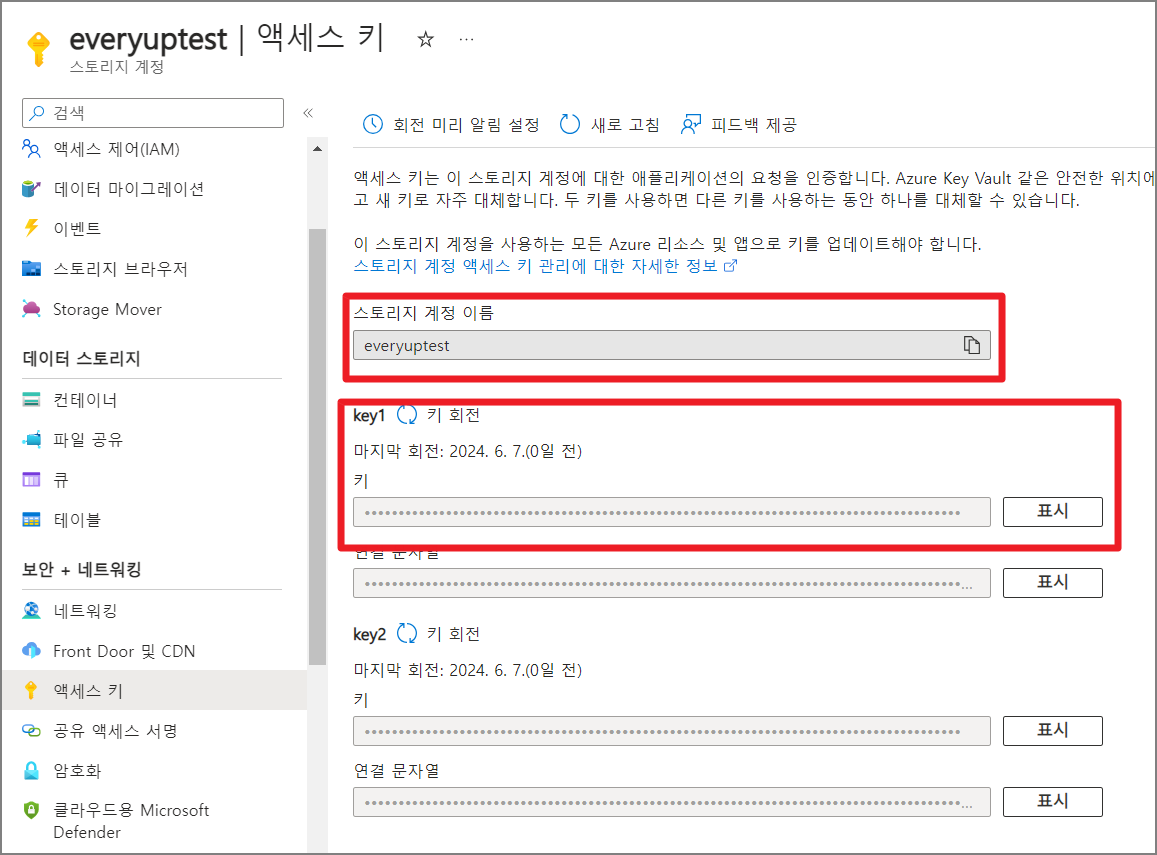
스토리지 계정 이름과 액세스 키를 CLI 명령어에서 사용 시 아래와 같이 옵션을 추가하여 사용합니다.
ex) --account-name $AZURE_STORAGE_ACCOUNT --account-key $AZURE_STORAGE_KEY
컨테이너 생성 및 확인
스토리지 관련 명령어는 az storage 명령어로 관리되며 컨테이너 생성을 위한 container create 등의 옵션이 추가적으로 필요합니다.
앞에서 확인한 스토리지 계정 이름과 액세스 키를 사용하여 "test-container-02" 이름의 컨테이너를 생성해보겠습니다.
> az storage container create --name test-container-02 --account-name $AZURE_STORAGE_ACCOUNT --account-key $AZURE_STORAGE_KEY
{
  "created": true
}
생성이 완료되면 아래 명령어를 통해 생성된 컨테이너를 확인하실 수 있습니다.
> az storage container list --account-name $AZURE_STORAGE_ACCOUNT --account-key $AZURE_STORAGE_KEY
[
  {
    "deleted": null,
    "encryptionScope": {
      "defaultEncryptionScope": "$account-encryption-key",
      "preventEncryptionScopeOverride": false
    },
    "immutableStorageWithVersioningEnabled": false,
    "metadata": null,
    "name": "test-container-02",
    "properties": {
      "etag": "\"0x###############\"",
      "hasImmutabilityPolicy": false,
      "hasLegalHold": false,
      "lastModified": "2024-06-07T04:59:08+00:00",
      "lease": {
        "duration": null,
        "state": "available",
        "status": "unlocked"
      },
      "publicAccess": null
    },
    "version": null
  }
]
컨테이너 파일 업로드 및 다운로드
파일 업로드
이제 생성된 컨테이너에 파일을 업로드 해보도록 하겠습니다. az storage blob upload 명령어를 사용하여 "text2.txt" 이름의 파일을 "test-container-02" 컨테이너에 업로드 해보도록 하겠습니다.
> az storage blob upload --container-name test-container-02 --file text2.txt --name text2.txt --account-name $AZURE_STORAGE_ACCOUNT --account-key $AZURE_STORAGE_KEY
Finished[#############################################################]  100.0000%
{
  "client_request_id": "f6525a32-248b-11ef-####-###########",
  "content_md5": "CkKOC8iUNoUV##########==",
  "date": "2024-06-07T05:08:23+00:00",
  "encryption_key_sha256": null,
  "encryption_scope": null,
  "etag": "\"0x###############\"",
  "lastModified": "2024-06-07T05:08:24+00:00",
  "request_id": "106ef2b2-801e-006a-####-###########",
  "request_server_encrypted": true,
  "version": "2022-11-02",
  "version_id": null
}
파일 확인
생성된 컨테이너의 파일 정보는 az storage blob list 명령어를 통해 확인하실 수 있습니다.
> az storage blob list --container-name test-container-02 --account-name $AZURE_STORAGE_ACCOUNT --account-key $AZURE_STORAGE_KEY
[
  {
    "container": "test-container-02",
    "content": "",
    "deleted": null,
    "encryptedMetadata": null,
    "encryptionKeySha256": null,
    "encryptionScope": null,
    "hasLegalHold": null,
    "hasVersionsOnly": null,
    "immutabilityPolicy": {
      "expiryTime": null,
      "policyMode": null
    },
    "isAppendBlobSealed": null,
    "isCurrentVersion": null,
    "lastAccessedOn": null,
    "metadata": {},
    "name": "test2.txt",
    "objectReplicationDestinationPolicy": null,
    "objectReplicationSourceProperties": [],
    "properties": {
      "##### 생략 #####"
    }
파일 이름명만 확인하고 싶을 경우에는 해당 명령어에 --query "[].name" --output tsv 옵션을 추가합니다.
> az storage blob list --container-name test-container-02 --account-name $AZURE_STORAGE_ACCOUNT --account-key $AZURE_STORAGE_KEY --query "[].name" --output tsv
test2.txt
파일 다운로드
생성된 컨테이너의 파일을 다운로드하기 위해 az storage blob download 명령어를 사용합니다.
D:\TEST\test2-upload.txt 이름으로 파일을 다운로드 받도록 설정하였습니다.
> az storage blob download --container-name test-container-02 --name test2.txt --file D:\TEST\test2-upload.txt --account-name $AZURE_STORAGE_ACCOUNT --account-key $AZURE_STORAGE_KEY
{
  "container": "test-container-02",
  "content": "",
  "contentMd5": null,
  "deleted": false,
  "encryptedMetadata": null,
  "encryptionKeySha256": null,
  "encryptionScope": null,
  "hasLegalHold": null,
  "hasVersionsOnly": null,
  "immutabilityPolicy": {
    "expiryTime": null,
    "policyMode": null
  },
  "isAppendBlobSealed": null,
  "isCurrentVersion": null,
  "lastAccessedOn": null,
  "metadata": {},
  "name": "test2.txt",
  "objectReplicationDestinationPolicy": null,
  "objectReplicationSourceProperties": [],
  "properties": {
    "##### 생략 #####"
D:\TEST\ 경로 확인 시 test2-upload.txt 파일을 확인할 수 있습니다.

Azure CLI를 통해 이미 생성된 스토리지 계정에 액세스 키를 사용하여 컨테이너를 생성하고 파일을 업로드 및 다운로드 해봤습니다. 컨테이너 생성은 az storage container create 명령어로, 파일 업로드는 az storage blob upload, 파일 다운로드는 az storage blob download 명령어를 사용합니다. 업로드된 파일 목록을 확인하려면 az storage blob list 명령어를 사용합니다.
Azure 콘솔을 통해서도 위 작업을 동일하게 할 수 있지만, CLI를 통해 작업이 필요한 경우에는 위 방법을 활용하여 사용하시기 바랍니다.
지금까지 CLI 명령어를 통해 Blob Storage 생성 및 사용하는 방법에 대해 알아보는 시간을 가졌습니다....! 끝...!
유익하게 보셨다면 공감을 눌러주고, 댓글로 의견을 공유해 남겨주시면 감사하겠습니다!
[Reference]
https://learn.microsoft.com/ko-kr/azure/storage/blobs/storage-quickstart-blobs-cli
'Azure' 카테고리의 다른 글
| [Azure] AKS(Azure Kubernetes Service) 클러스터 CLI로 접근 후 Pod 생성하기 (0) | 2025.03.04 |
|---|---|
| [Azure] AKS(Azure Kubernetes Service) 클러스터 생성하기 (0) | 2025.02.26 |
| [Azure] Blob Storage 생성 및 기초 사용법 (0) | 2024.06.12 |
| [Azure] CLI(az) 설치 및 로그인 방법 (0) | 2024.06.08 |
| [Azure] 가상 머신(VM) 중첩 가상화 구축하기 (0) | 2024.05.03 |